::NAV BAR::

home about shop tutorials style recipes
Showing posts with label DIY. Show all posts

Tuesday, October 16, 2012

'mini' table runner DIY

Y'all, when the gals over at nwaMotherlode asked me if I would do a DIY post for them I jumped on board. I had been wanting to make something for my table anyway so I made this little Fall inspired 'mini' table runner. Go ahead and check out the DIY here


While you're there check out their about page and take a look around their site! :)

Have a blessed day!

-Mandy

Thursday, September 20, 2012

Fall Yarn Wreath DIY

Y'all, I made a yarn wreath. I have a lot of respect and admiration for those of you who make & sell them for a living. You either know something I don't or you have an excessive amount of patience. Can I please have some of yours?! I seem to be lacking. :) Anyway, here is how she turned out!


Oops, I should've grabbed the next size bigger straw wreath....it looks a little small for my front door so I'll have to find a spot for her inside the house. I shouldn't have a problem finding a spot though. And hey, looking on the bright side, I'll get to look at her all the time. So, you know what that means...I've got to make another wreath for my front door. I'm thinking burlap.

If you want to make a yarn wreath for yourself, do it! There are lots and lots of tutorials online. Just check pinterest. Here's the link of the one I referenced for help.

Happy Fall y'all!
Mandy

Thursday, August 23, 2012

DIY PLAY DOUGH

Yesterday I perused pinterest in search of fun things to do/make with toddlers, things that help them learn as well as have fun! Among other things I found an AWESOME play dough recipe that calls for JELL-O. Um, fun! Here's the link, you'll definitely want to do this with your kiddos on a rainy day or any day, really.


Noah and I had a lot of fun playing with our home-made play dough. We made pizza, cookies, a bird, we really enjoyed just squishing it with our hands AND since we used JELL-O (the berry flavor) it smelled really good, not to mention it's a pretty color. I know Noah really enjoyed it because he played with it quietly for a good 30-40 minutes. I'd say that's pretty good. We're definitely going to be making more, maybe even tomorrow. I think we'll make yellow so we can mix some blue with some yellow and make green! 

Here's the link to the recipe again (click the picture):


Friday, March 16, 2012

instafriday

1.

2.

3.

4.

5.
1. sweet photo of Dallas putting Noah to bed. 2. planning stages of a tote for myself 3. we found some moss while we were playing outside :) 4. i love my new anthropologie mug! i couldn't help myself it's just so cute! 5. finished product of #2! the ruffle did noooot look good at the bottom like i had planned. i love it though! it's my farmers market/library/craft tote. :)

I'm planning on making a sunglasses case to match, which means a DIY post in the near future! I would've DIY'd the tote but I'm a bad girl, I didn't measure my pieces and I just don't know how to condense a project like that for a blog post.


life rearranged

Thursday, December 8, 2011

Christmas Craftings


So, I've noticed a lot of felt holly on the good ol' internet lately; like here. I'm kind of in love with felt at the moment. There are so many wonderful things you can make with it and so many beautiful colors to choose from. To sum it up, felt is great. Anywho, I decided to make a little holly with berries as part of my Christmas decor. 


And hot glue those berries down. I also hot glued a yarn loop in behind and backed it with felt so that I could hang the holly. :) That was so easy you're probably thinking, 'I don't think I needed all those pictures and step by step instructions, but thanks.' Well, you're welcome. Winky wink. Also, I know the first picture has led you to believe that my felt holly/mistletoe thingy is hanging on my Christmas tree right now. Well, it's not...it's actually a part of another Christmas craft that I've got in the works. You'll just have to stay tuned for that one. Until then...GET YOUR CRAFT ON!

-Mandy

P.S. Did you know I'm doing my very first giveaway on someone else's blog? Yep, I am. You should definitely check it out. While you're there you should dive into Anne's blog (Wattlebird), it's full of outfit inspiration, diy's and just lots and lots of craftiness.

{EDIT}
<<GIVEAWAY CLOSED>>

Tuesday, August 2, 2011

Tipsy Tuesday Feature!!

It's that time again, Tipsy Tuesday time. Do you have a tip, tutorial, recipe, etc. to share with us? If not, here's a little secret...you can always come back and link up later, it doesn't expire. So, no worries! For those of you who are just stopping by for the first time you're probably wondering what I'm talking about, click here to find out the details.

Instead sharing a tip with you this week I thought it would be nice to feature some of those who have linked up in the past couple of weeks! Being featured every now and then is just a little perk of linking up. Now that I've enticed you, let's get on with it. ;)

Lyndi, from NWAfoodie shared why you would or wouldn't want to rinse your rice!


Samantha from The White Orchid Studio shared how to make a Roll-up Fabric Paintbrush Brush Holder


Earl from Earl-Leigh Designs shared a tutorial on how to make what she calls The Dirty Girl's Wallet :)


& the next week she shared an Easy, Cheesy Eggplant Parmesan recipe!


{source}


yummy!


I'd say these are pretty valuable tips! Much thanks to all who have been participating in Tipsy Tuesday! And if you haven't linked up with us before I hope you'll consider linking up today and in the future! You never know, you may end up being featured or winning a fabulous prize. ;)

Linking up is simple, just put your name and the link to your specific blog post in the box below.

Have an awesome Tuesday!!!


-Mandy


Friday, June 17, 2011

Father's Day Photo Shoot

yesterday i shared a couple diy fathers day gift ideas i found on pinterest. i finished the iphone card without any problems but the awesome dad photographs still have a few kinks to work out.


we had our photo shoot today at granny's house because her yard is super cute.


 well, i was hoping for better cooperation but i must say i'm delighted with the rather humorous shots little squirt gave me.


here are the three the made the cut. :)


he didn't want to hold the letters the way mommy wanted him to and that is just fine


because we can still make out what they are


and they still spell dad no matter how you look at it.


so there! ha! i win!


oh and we wanted to show some love to grandpa and papa but he won the battle on that front.


this is as close as we got.


maybe we'll try again next year.


and lastly, here's squirtles posing with his t-ball gear.


so. cute.


and now i have another problem.


the frame i bought is for 3x5 photos. and walmart doesn't print that size.


what to do what to do?! i'll figure something out.


i'd love to hear/see what you're doing for the dad's in your life. if you have a post about it leave a link in the comment section below! hope to hear from you!


xoxo


-mandy


Thursday, June 16, 2011

Father's Day Extravaganza!

i think i'm more excited about this father's day than any other. thanks to pinterest i've found a fantastic tutorial for a card that absolutely fits my man's personality to a t. thats not all, i also found inspiration for the perfect gift! i can't wait to share the complete project with you. :)


if your guy is all about the apple products then this homemade card is for you...errr him. all you need for this project is black and white cardstock, spray adhesive, an exact-o knife {if you're a crafty mom & you don't have one you will find yourself needing one eventually, might as well buy one}, a cutting mat, and markers. easy peasy.
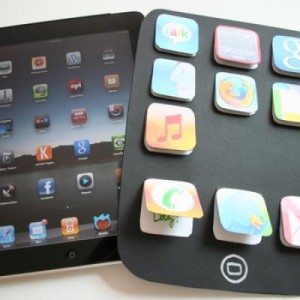


want to make this for your guy? here's the tutorial.


found it via pinterest.


prepare yourself for cuteness overload for this next father's day gift idea. now if i can just get noah to cooperate {& the weather}. i bought wooden letters {d & a} from hobby lobby and painted them my favorite color, teal. i also bought a picture frame so awesome that i can't explain it with words. you'll just have to wait and see. ;) i can only imagine the cuteness and hilariousness that will become of our little upcoming photo shoot.
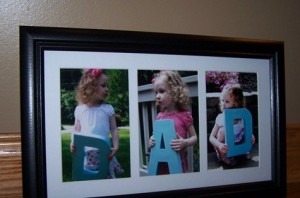


found this picture on pinterest as well.


i hope these DIY fathers day projects have inspired you as much as they have me. now go whip up something special for the dads in your life!


mandy <3

Thursday, April 21, 2011

The Clutch

I've decided I've about had it with making headbands so I came up with a little clutch design. I've only made one clutch before and I followed the same steps when it came to putting it together but mine is a bit bigger (the dimensions are completely different), the outside piece isn't ruffled but the panel is and I didn't include a divider as I didn't think it served much of a purpose. I also squared the bottom corners so it seems to have more room and can stand up on it's own. Also, mine has a handle. 

I'll have a limited supply of these at the craft fair. I hope they sell!

I think I'll move the panel up a little on the next one. 

I'm hoping to make some canvas clutches, and possibly some iphone holders as well!

Please let me know what you think!

Thursday, April 14, 2011

Can I get a break?

I've been making headbands in my spare time nonstop the past few weeks. I dream about them, I can't fall asleep because of them, I wake up in the middle of the night thinking about them, I'm tired. It's official, I think I've burned myself out. I'm taking a break after the craft fair and not making anything craft related for a week. When that week is up I'm going to make the bag I bought a pattern for weeks ago as a gift to myself. Then, on to more crafting adventures. I need a little variety though, not just hair accessories, but bags, kitchen towels, and definitely more crochet items. The possibilities are endless!

Here's another sneak peak of the items I've been working on.

Ivory Chiffon Flower Bobbies: 


Could be worn by a bride or bridal party.

And to change the subject...because I love to do that...

Have you ever shopped at your local Goodwill? I haven't been since high school but I went the other day hoping to find some decor for our booth and I actually found quite a few awesome things! They had a boutique section where I found two beautiful Fossil dresses but they were both size Large. :( But on the bright side I found a brand new, still in the package wine bottle opener! Score! We've been using our broken one for uh...years. 

I found this mirror to use on my table at the craft fair. I'm going to spray paint it ivory and then use my friend Samantha's leftover charcoal antique gloss on the crevices. This is a horrible picture! The mirror is really ugly too but I'm hoping the paint will pretty it up a bit. 


I decided on this color for the mirror. I've never spray painted anything before...EEK!


I also found a shadow box that I failed to take a picture of to display my earrings in at the show.

Oh and I found this little guy hanging out in a random spot...and I had to have him. I gave him to my husband and he loved it.


Isn't he cute and strange? My grandmother told me that she has a friend who collects owls. Apparently they're good luck if you're the superstitious type.  

Hope you all have a great weekend! 

Mandy


Saturday, March 19, 2011

Spring Wreath Ideas

I've talked my husband into taking me to Hobby Lobby today to get supplies to make a Spring wreath for our front door. Aren't I lucky? I just love wreaths and Spring! I can't wait for everything to be in bloom. I decided to search for a few tutorials to inspire me. So, let me share them with you. :)


1. This first tutorial is from Sunshine and Carousels.
What you need for this project is
-straw or foam wreath
-colorful cupcake liners
-yarn
-matt modge podge
-needle and thread

While this wreath is absolutely adorable it's not what I'm looking for. I had to share it with you because of the unique items used to make it. I never would have thought to use cupcake liners on a wreath! How creative!


2. This inspiring tutorial is from Centsible Savings (love the blog name!).

This blogger saw a wreath in Michaels that she absolutely loved but it was extremely pricey; at $69.99, so she took a few pictures of it and decided she could create her own version of it. Well, she did and she spent a mere $10.98! She grabbed the grapevine wreath at goodwill and didn't glue the flowers down so the wreath is reusable! Very green. :)


3. Ok now we're getting closer to where I'm wanting to go. This wreath tutorial is from A Diamond in the Suff.

I love moss wreaths at the moment. I suppose they are really 'in' because in my searches I found a few tutorials on how to make a plain moss wreath that were Crate and Barrel/Pottery Barn inspired. I don't want just a plain ol' wreath! I need some pizazz like this one. She used a grapevine wreath, a few different kinds of mosses, butterflies, (that she painted) and some bird's nests. I really like the ethereal look.


4. Oh my goodness I am drooling! This wreath was made by Stephanie Lynn on Under the Table and Dreaming.

Is this not absolutely stunningly gorgeous?! Does anyone agree with me that this would be perfect for a wedding? Definitely so! I must share this with my bestie who is getting married this summer. Perhaps she'll want one or two and I'll get to make them. I'm not sure if I like it for my front door for two reasons, 1: it's a little too dressy for my taste; 2: TIME CONSUMING! She hand rolled all of the flowers from recycled book pages. Don't get me wrong, I would love to spend hours making this because it would be totally worth it BUT I'm needing a quick fix for my door asap. :)

 I'm having a love affair with this wreath...I'll probably make one anyway....

p.s. this picture was on her site as well, I'm sure you would just do the same thing but glue the rolled flowers to a styrofoam ball. Again, gorgeous for a wedding.


Okay, I think I'm done for now. I'll let you all know what I come up with when I have finished. 

-Mandy


Thursday, January 27, 2011

Giddyup!

My little man is turning 1 Saturday (though the party is on Sunday, and I'm regretting the time I chose as he is usually asleep at 3 pm)! I can't believe it! I'm such a procrastinator so I'm finally sitting down to document everything I'm doing to get ready for the party. I thought I would share some pictures of what I've done so far, yet there is SO much left to do.

What we're going to wear.....
My shirt is from Banana Republic that I happened to get on CRAZY sale for basically 20 buckaroos...oh yes!

I looooove love the ruffles.


These boots...Ariat...got them for 30 bucks because I posted a facebook status asking where I could get cheap boots, it just so happened a friend from high school had a pair in her garage sale pile. What a blessing!! 


Here is Noah's Birthday Banner in progress, I have a few more triangles to sew on.


Oh! And the invite (i made it on gimp)! With the address blurred of course.


This is what I've been working on today....


thank you tags for the bags that will contain the cookies cut from these magnificent cowboy cookie cutters!!!!


Well, that's all for now. I'm also making cupcakes and a horseshoe shaped cake but I'll save the pictures of those for the next post which will be pictures of the actual party. I'm so excited. It's going to be so cute, and fun!!!